I wanted to get used to using some freeware called Startrails (believe it or not!!!) I found it while researching star trails astrophotography, and it is GREAT! Simply, it acts much like regular astro image stacking software. But what it does is place each individual frame on top of each other using the entire frame as a reference, not the stars themselves. The advantage of this is that if you live in a light-polluted area (which, sadly, most of us do!) you can take short exposures and then stack them using this software to create a final star trails image. For practice over recent nights, I was able to use 30 second exposures to generate decent image issues once stacked. This was with neighbors' houses well-lit and a light dome from a nearby toll booth station! The software is also REALLY easy to use. Simply point it to the directory/files which are in effect your light frames, (optionally) point it to your dark files, and click on the "Startrails" button in the application and it processes the image for you. It will even produce an .AVI movie of your shots which illustrates the movement of the stars around the polar region quite nicely (depending on your raw shot quality, of course!!!) Anyway, the link to the software is here.
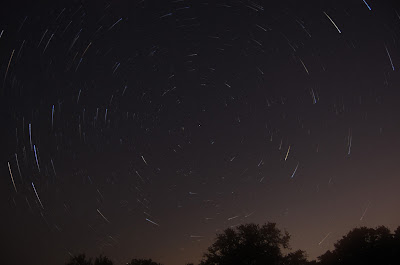
Tonight, after some heavy clouds, the skies suddenly cleared and I drove about 20 miles north of home, to a dark highway turnoff. I took about 35 minutes worth of images before unexpected fog hindered my ability to take additional snapshots. Below is the image resulting from these shots and the use of the Startrails software.
Image Details:
- Nikon D40
- 18mm lens setting @ F5.6
- ISO200
- 35 * 1 minute exposures
- Stacked in Startrails

Not a bad image, really. You might be able to point out Cassiopeia to the left, and Ursa Major to the right!
Next time I will try for somewhere between one and two hours. Anyway, get the software and give this a try! For those folks without scopes but with DSLRs and a decent tripod, this software allows you to easily obtain nifty looking star trails images.
9 comments:
This is great Phil! A really nice shot. Clouds are the biggest bugbear with this kind of photography and they always appear just when you're in the middle of shooting for star trails.
Even on the clearest of nights I always get clouds half way through shooting, but you can't go wrong really as you always end up with something really worth while.
Looking forward to seeing the results of your really long trail session!
Wow, nice report! I agree with you, Startrails software is great for this type of pictures!
I have also published post about star trails and my picture here!
I have added you to blogroll, really nice work!
Thanks, chaps!
MyAstro - nice blog there! I will add your blog to my links list as well. Thanks for dropping by!
Thanks! Be sure, I'll be frequent visitor here, you have amazing stuff :)
Hey mate, one thing I hear of people doing on a photography forum I'm on is taking several photos of several minutes (up to how many mins I don't know) and then stitching/melding them together in photoshop. The reason is then that you can skip any photos where clouds get in the way or perhaps a car's britght lights or something.
Food for thought anyway ;)
Cheers, Jase
Hey Jase,
I will try that! The StarTrails freeware does a pretty good job though!
Cheers,
Phil
I followed your link to the software and yeah it seems that it's doing the same sort of thing...
Hey quick question...do I have to use a remote trigger? is that the only way? I dont have one, and I really want to take a shot at this asap.
Anonymous:
Using a remote is the best way to go, but there are two other options:
a. Use a timer (see if your camera has a self-timer function) which will allow you to open the shutter after you press the shutter release button, thereby removing any vibration you'd get otherwise
b. Cover the front of the lens with a large piece of paper or an object. Open the shutter, count to one second, then remove the object. Time your exposure, then when you're ready to close the shutter, put the object back in front of the lens, count another second and press the shutter button again. This will remove any sign of vibration against the sky in your images that you would get normally
Hope either works out for you.
Post a Comment